Learn how to make beef ribs in oven using simple home cooking methods
Table of Contents
How to Make Perfect Beef Ribs in Oven : A Simple Home Cook’s Guide to Fall-Off-The-Bone Tenderness
There’s something magical about Sunday afternoon when your kitchen fills with the deep, rich aroma of beef ribs slowly transforming into tender perfection. Your loved ones drift toward the dining room, drawn by anticipation. Here’s the beautiful truth: you don’t need fancy smokers or decades of grilling expertise to create this experience.
I’ll never forget my first successful attempt at oven-baked ribs. After years of believing restaurant-quality results were reserved for professional pitmasters, I discovered something liberating—the secret wasn’t complicated gadgets or culinary degrees. It was simply understanding a handful of straightforward techniques that any home cook can master. Today, you’re getting every lesson I’ve learned so you can recreate these unforgettable moments in your own home.
Why Your Oven Is Your Best Friend for Beef Ribs
Let’s address the elephant in the room: can your regular kitchen oven really compete with traditional BBQ methods? Absolutely, and here’s why this might actually become your preferred approach.
Your oven gives you something outdoor cooking can’t guarantee—precise, unwavering temperature control. No flare-ups, no weather cancellations, no running outside in January to check your meat. Whether you’re living in a small apartment or simply want to avoid the hassle of charcoal and propane, oven-baked beef ribs deliver consistent results every single time.
The accessibility factor alone changes everything. While your neighbor fiddles with temperature gauges and wood chips, you’ll be relaxing with your family, knowing your oven is doing the heavy lifting. Plus, this method actually requires less hands-on attention than grilling, freeing you up to prepare sides or simply enjoy your day.
Understanding Your Beef Rib Options
Walking into the butcher shop can feel overwhelming when you’re staring at different cuts, all labeled with unfamiliar terms. Let’s simplify this.
Back ribs, sometimes called short ribs, are your weeknight-friendly option. They’re meatier, smaller, and reach tender perfection in about 2.5 to 3 hours. These are ideal when you’re craving beef ribs but working within time constraints.
Plate ribs, often dubbed “dino ribs” for their impressive size, are your showstopper choice. These massive bones with generous meat coverage need 3.5 to 4 hours but deliver that jaw-dropping presentation that makes guests reach for their phones to snap photos.
When you’re selecting ribs at the market, look for bright red meat (not brown or gray), good marbling throughout (those white fat streaks equal flavor), and a meaty side that’s at least one inch thick. Plan on 1 to 1.5 pounds per person—beef ribs are rich, and that’s usually plenty.
Beef Ribs in Oven : The Essential Preparation Steps Nobody Should Skip
Here’s where many home cooks stumble, and it’s completely understandable. That thin, silvery membrane on the bone side of your ribs? It absolutely must come off. This layer acts like a barrier, blocking your carefully crafted seasonings from penetrating the meat and creating an unpleasantly chewy texture.
Flip your ribs bone-side up. You’ll spot a shiny membrane stretched across the bones. Slide a butter knife under one end to loosen it, then grab it with a paper towel (the grip makes all the difference) and peel it away in one smooth motion. Some resistance is normal—just keep steady pressure and it’ll release.
Next, examine the fat. You want some marbling for moisture and flavor, but those thick, hard deposits should go. Trim down to about a quarter-inch fat cap, removing any silver skin you encounter. This five-minute investment dramatically improves your final result.
Beef Ribs in Oven : Creating Your Flavor Foundation
The dry rub you’re about to make will become your secret weapon. Mix these ingredients in a bowl:
- 1/4 cup brown sugar (creates that coveted caramelized crust)
- 3 tablespoons smoked paprika (delivers depth and color)
- 2 tablespoons black pepper (adds pleasant heat)
- 2 tablespoons kosher salt (enhances every other flavor)
- 1 tablespoon each of garlic powder and onion powder (savory backbone)
- 1 teaspoon cumin (earthy warmth)
- 1 teaspoon mustard powder (subtle tang)
- 1/2 teaspoon cayenne pepper if you enjoy heat
Coat every surface of your ribs generously with this mixture, patting it into the meat so it adheres properly. Now comes the hardest part—patience. Let those seasoned ribs sit in your refrigerator for at least 30 minutes, though 4 to 24 hours delivers even better results as the salt works its way into the meat fibers.
The Low and Slow Method That Guarantees Success
Preheat your oven to 275°F. This moderate temperature is the sweet spot where connective tissues break down without drying out the meat. Place the oven rack in the middle so heat circulates evenly.
Line your roasting pan with aluminum foil (trust me on this—cleanup will be effortless). Pour half a cup of beef broth, water, or even beer into the bottom of the pan. This liquid creates steam and prevents scorching.
Now wrap your ribs tightly in heavy-duty aluminum foil. This creates a steam chamber—essentially braising your ribs while they roast. Make sure the seal is tight; you’re trapping moisture that will transform tough connective tissue into gelatin.
Slide your wrapped ribs into the oven and set a timer for 2.5 to 3 hours for back ribs, or 3.5 to 4 hours for those impressive plate ribs. Resist the temptation to check on them. The sealed environment is working its magic.
Testing for Perfect Doneness
When your timer sounds, carefully open the foil (watch for that hot steam burst). Place an instant-read thermometer into the thickest section of the meat, making sure it doesn’t touch the bone. You’re looking for 195 to 203°F—the temperature range where collagen has completely broken down.
Visual cues confirm what your thermometer is telling you. The meat should have pulled away from the bone ends by about a quarter to half inch. When you insert a fork, it should slide in easily with minimal resistance. The bones themselves should wiggle freely when you twist them gently.
If you’re not quite there yet, reseal the foil and give your ribs another 20 to 30 minutes. Better to wait a bit longer than to serve tough ribs.
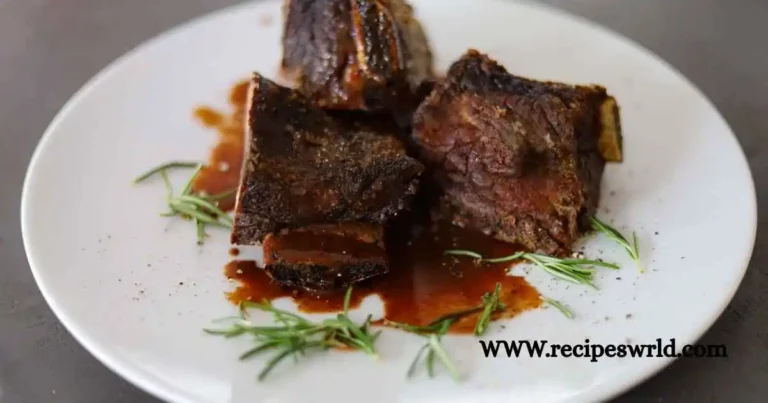
The Sauce and Caramelization Finale
Once your ribs are tender, remove that foil completely. Brush on your favorite BBQ sauce—whether store-bought or homemade, apply a generous coating to all exposed surfaces.
Crank your oven up to 350°F and return the uncovered ribs for 20 to 30 minutes. During this phase, you’ll baste them every 10 minutes, building up layers of caramelized sauce. Watch carefully during the final minutes; you want deep browning and slight charring, not burnt sugar.
When you see that glossy, sticky coating with darkened edges, your ribs are ready. Remove them from the oven and tent loosely with foil for 10 to 15 minutes. This resting period allows juices to redistribute throughout the meat instead of running onto your cutting board.
Common Mistakes and How to Avoid Them
Even with clear instructions, certain pitfalls catch home cooks off guard. Cooking at too high a temperature is the number one culprit behind tough, dry ribs. Stay disciplined with that 275°F setting—rushing the process backfires every time.
Skipping the foil wrap ranks as mistake number two. Without that steam chamber, your ribs will dry out before they tenderize. The foil isn’t optional; it’s essential to the technique.
Applying sauce too early leads to burnt, bitter flavors. Sugar in BBQ sauce caramelizes quickly, crossing from perfect to ruined in minutes. Save the sauce for those final 30 minutes only.
Finally, cutting into your ribs immediately after removing them from the oven guarantees all those precious juices will run out onto your board instead of staying in the meat. Those 10 to 15 minutes of resting aren’t suggestions—they’re requirements.
Storing and Enjoying Leftovers
If you somehow have leftovers (it happens, though rarely), proper storage keeps them delicious for days. Let the ribs cool to room temperature within two hours, then wrap tightly in foil or transfer to an airtight container. They’ll stay fresh in your refrigerator for up to four days.
Reheating demands a gentle touch. Preheat your oven to 250°F, wrap the ribs in foil with a couple tablespoons of liquid (broth, water, or even apple juice), and warm for 20 to 30 minutes. For extra texture, unwrap them and broil for 2 to 3 minutes to crisp up the exterior.
Your Path to Rib Mastery Starts Now
You’ve just gained all the knowledge needed to transform from uncertain beginner to confident rib master. The technique for perfect beef ribs in your oven isn’t complicated—it’s about respecting the process, maintaining patient heat, and trusting proven methods.
Whether you’re planning a casual family dinner or hosting friends for a celebration, these tender, flavorful ribs will steal the show. The best part? You’ll look effortlessly skilled while your oven does most of the actual work.
Here’s your action plan: Head to your butcher this week and pick up quality beef ribs. Mix that simple dry rub. Set aside an afternoon when you can let your oven work its magic while you relax. Follow these steps exactly as written, and prepare yourself for the satisfaction of serving fall-off-the-bone perfection.
Your kitchen is about to become the most popular room in the house. Those incredible aromas, the tender meat, the caramelized crust—all of it is within your reach right now. Stop putting off this rewarding cooking experience and start creating those memorable meals your family will request again and again.
Fire up that oven and discover just how amazing beef ribs can be when you understand the simple science behind tender, flavorful results. Your first perfect rack of ribs is just one afternoon away.